How I Make Faceless YouTube Videos: Workflow
Once the script is finished, the slow part of a scene-based video is everything that comes after it: generating each image, keeping the files in order, matching them back to the right lines, creating the voiceover, and syncing 150 to 200 scenes by hand.
I rebuilt that entire production stage around a Google Sheet. One row holds the scene, prompt, image and timing, while Gemini, Runware and ElevenLabs handle the repetitive generation work in the background. The final MP4 is assembled from that data instead of being built manually on a timeline.
After a few hundred videos it had become obvious that the bottleneck was never creativity. It was coordination: moving information between tools, keeping scenes in order, and fixing small production mismatches that should never have existed. The creative decisions stay with me. The Sheet automates the clerical work and passes each job to the right model. That only works because of APIs.
Two ways to use AI tools: websites and APIs
The biggest difference is what you control and how you pay.
A subscription tool gives you a finished interface and bundles the workflow behind it. With APIs, each production stage can be connected directly to the provider you choose, billed according to usage, and replaced without rebuilding everything else.
Most AI tools sell access through a monthly subscription. That works when you live inside one platform. But a video workflow needs a text model, an image model and a voice model, and the subscriptions start stacking up: three or four of them, each charging every month whether you publish or not.
An API bills for what you actually use. A few cents of Gemini for the prompts, a few cents of image generation, then the narration through ElevenLabs. Instead of paying three platforms monthly, I pay the providers directly for the work the pipeline actually did.
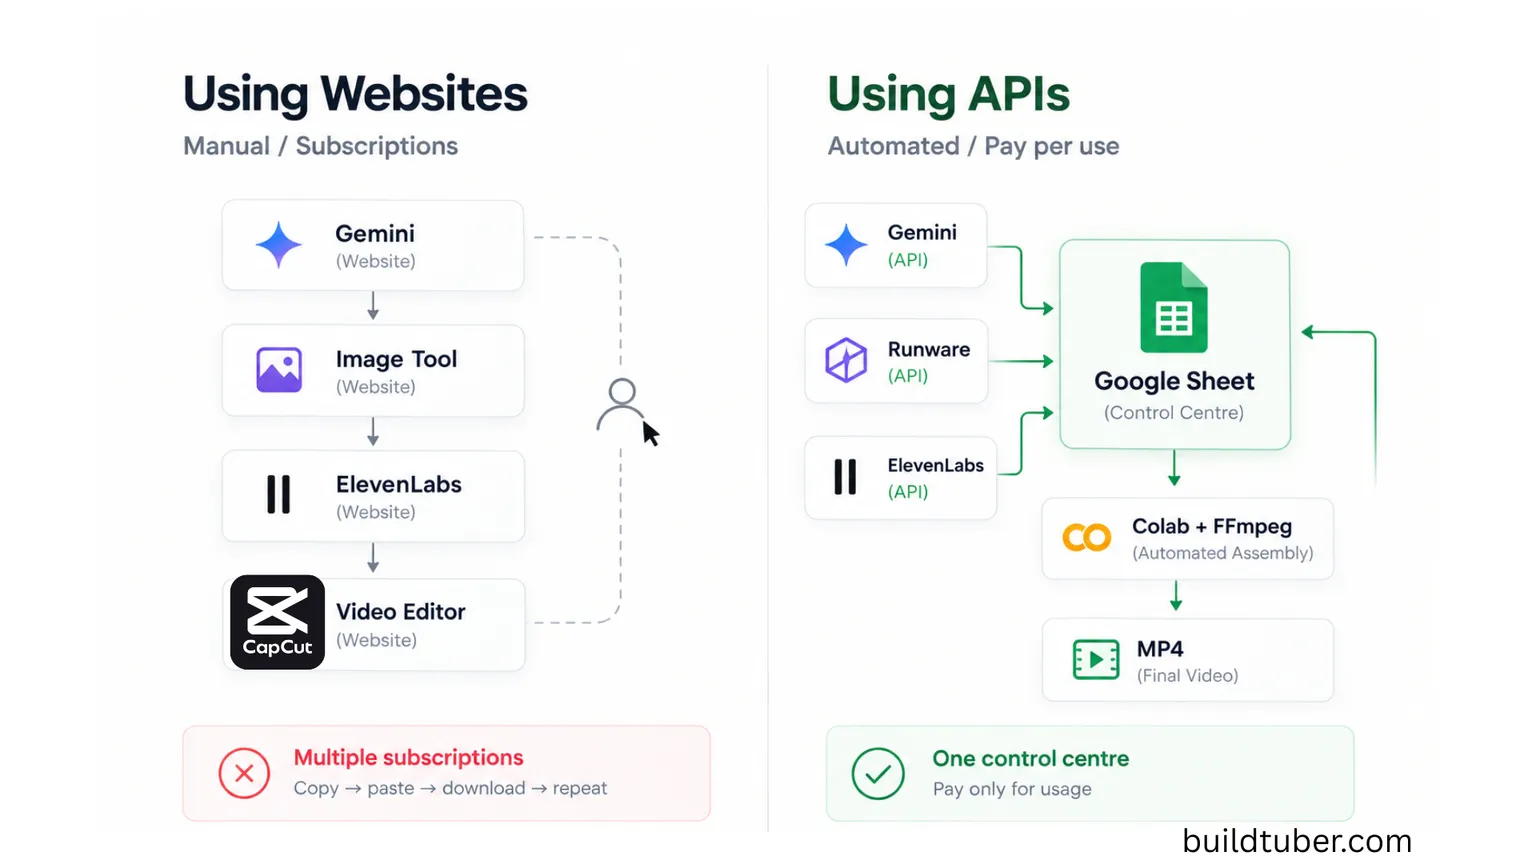
That is the whole argument for building the workflow around APIs. The Sheet becomes the interface, and the models run in the background only when there is something for them to do.
The Sheet as the control centre
Each row is one scene. It holds the narrated line, the image prompt, the generated frame, the voiceover timing and the current status, all on the same row. Nothing about a scene lives anywhere else.
From there the Sheet sends each task to the right API in order. Gemini turns the line into a visual prompt, the image model renders the scene, ElevenLabs produces the narration and the timing data, and every result comes back into the row it belongs to.
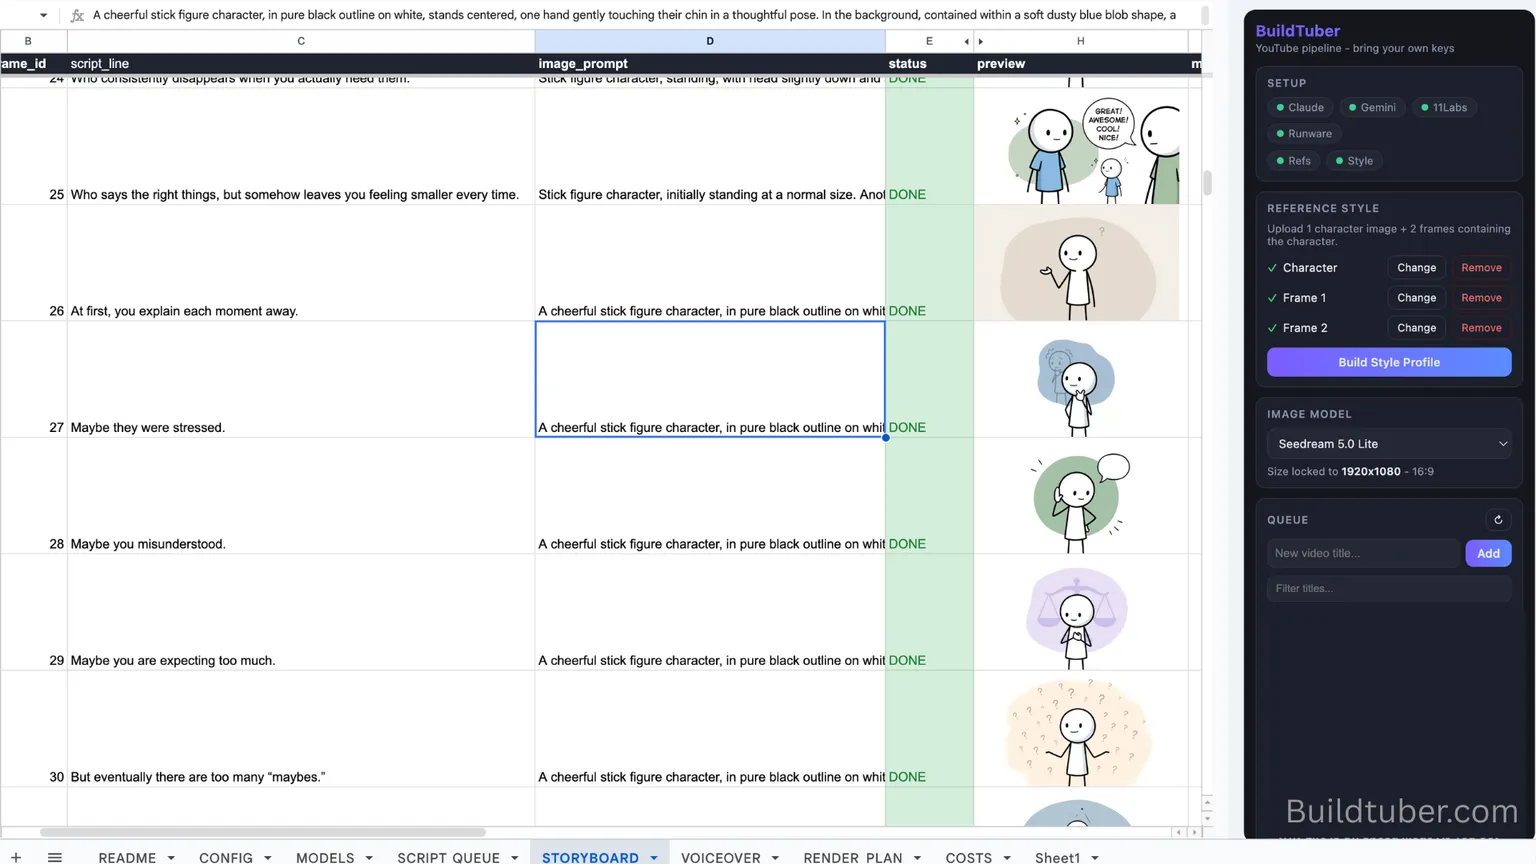
The tabs along the bottom are the stages: CONFIG for keys and settings, MODELS for the image models and their rates, STORYBOARD for the scenes, VOICEOVER for the narration chunks, SFX_PLAN for the sound cues, RENDER_PLAN for the timings and COSTS for the running total.
Generating the images in bulk
Once the script is split scene by scene, each row goes to Gemini to be turned into a detailed visual prompt. Gemini also gets a fixed style profile, so the character, colours, backgrounds and overall look stay as consistent as the models allow across the full batch.
Those prompts go to the image model through Runware, which gives API access to a large number of image models behind one key. I mostly use FLUX.2 Klein, because 200 scenes come to about thirty-four cents. Each finished image is numbered and saved into the right Drive folder as it arrives.
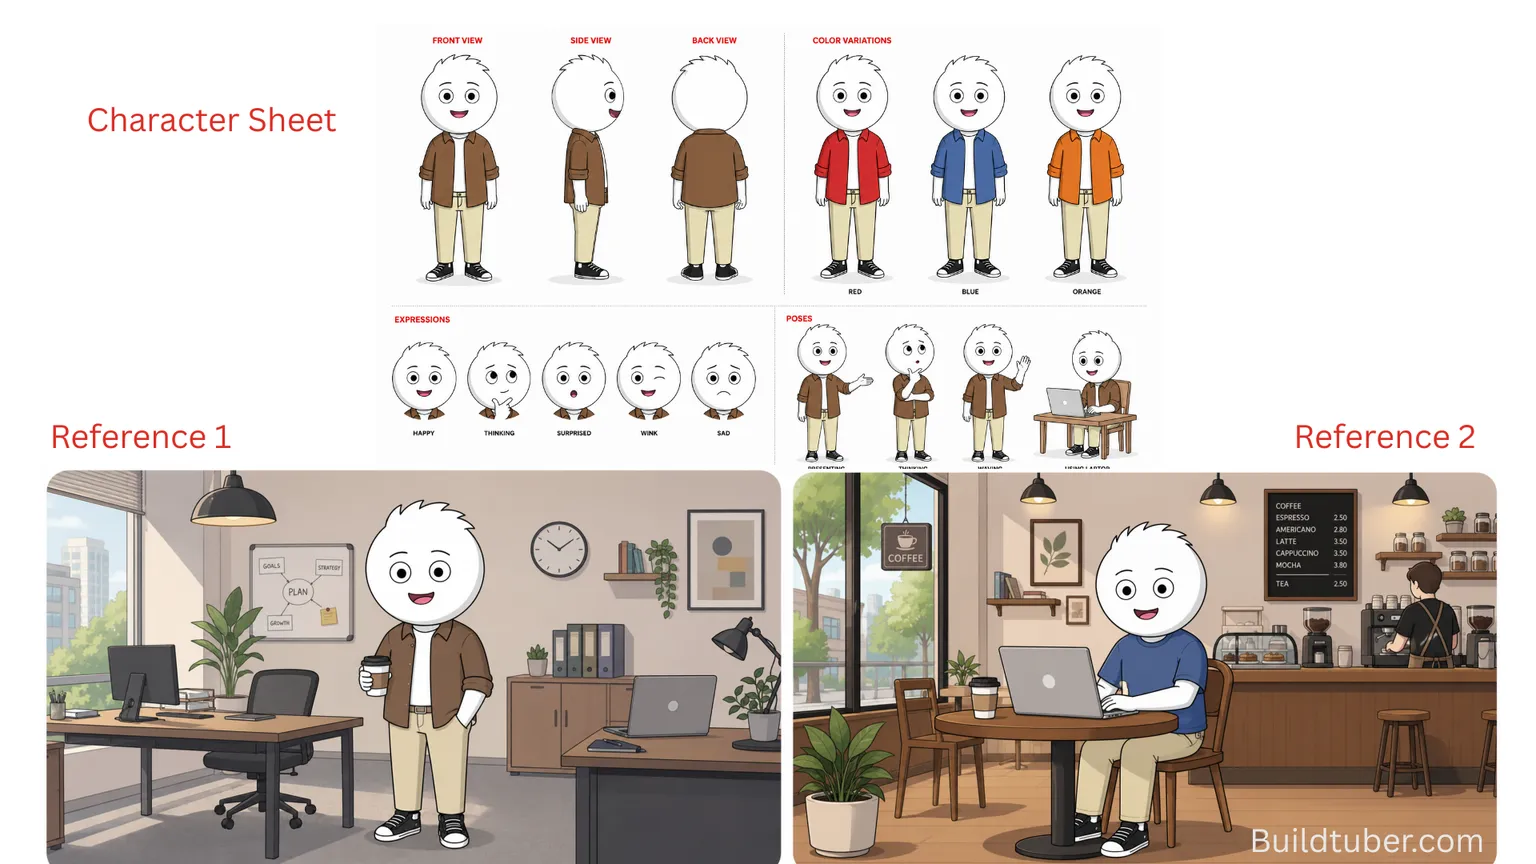
Consistency comes from reusing the same references across the whole batch: one clear character reference, and two finished scenes that define the visual language. Text prompts alone are usually not enough to keep a character visually consistent across hundreds of scenes.
This is the half I have written up in detail elsewhere. If the images are the part you care about, the scene generation guide covers the prompting, the reference images, the model choice and the measured per-image costs properly.
Getting the voiceover and the timing data
With the images ready, the Sheet sends the script to ElevenLabs and generates the narration.
The useful part for this workflow is not just the audio. It is the timing data that comes with it. ElevenLabs returns the start and end time of every line, and those get written back into the matching rows.
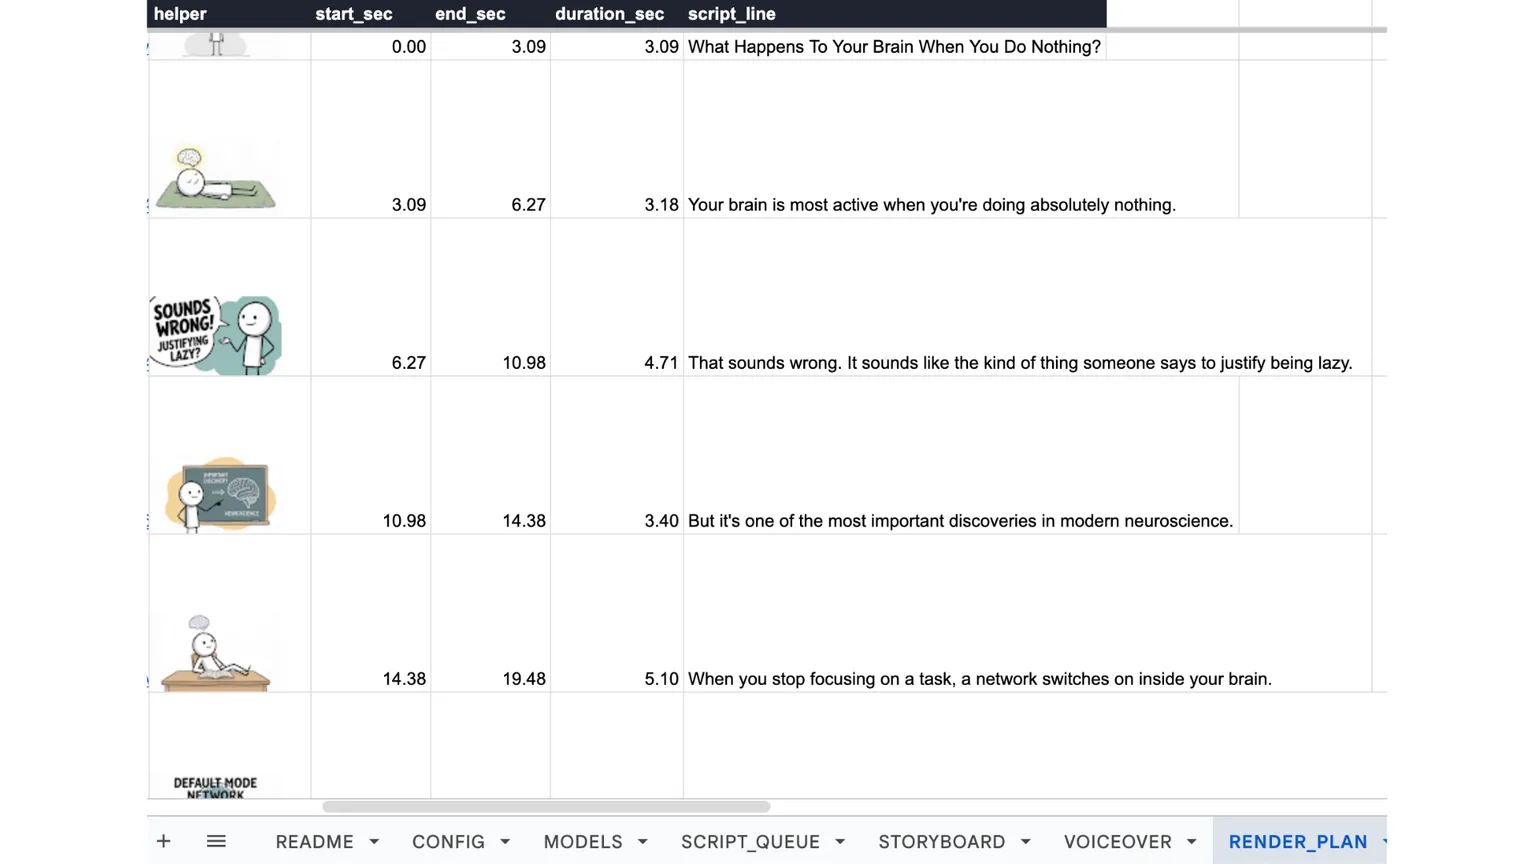
That table is what removes the manual editing later. Every image already knows how long it stays on screen, so there is nothing to drag into place and nothing to nudge back into sync. The cut is described by data before it is ever rendered.
Two smaller things happen at this stage and both are worth knowing about. The sound-effect plan is written during the storyboard stage, before a single image or second of audio has been paid for, so the sound design can be edited while it is still free. And the video only fades to black where the script changes chapter and the narrator pauses long enough to cover it. Every other cut is a hard cut, which is what it should be. A transition on every cut is the fastest way to look amateur.
Turning it into the final MP4
At this point the Sheet holds the script, the numbered images, the narration and the timings. The last stage assembles them without opening an editor.
A free Google Colab notebook connects to Drive, reads the images in scene order, pulls the timing data, adds the voiceover and passes everything to FFmpeg. FFmpeg holds each image for its recorded duration and writes the finished MP4 back to Drive.
So instead of building a 200-scene timeline in CapCut by hand, the notebook automates the assembly and hands back a finished video. I currently render this through Colab’s free tier, so there is no additional rendering charge in this workflow.
What the whole thing costs
For a six-minute video of roughly 200 scenes, on the cheapest image model:
| Stage | Cost | Where the number comes from |
|---|---|---|
| Images, FLUX.2 Klein | $0.34 | Runware billing dashboard, 13 Aug 2026 |
| Voiceover, ElevenLabs | $0.64 to $0.81 | $0.10 per 1,000 characters narrated |
| Rendering, Colab and FFmpeg | Free | Free tier |
| Scene prompts, Gemini | Not measured | Billed by Google, never read off a bill |
| Total | Roughly $1 to $1.25 | Addition, with room for retries |
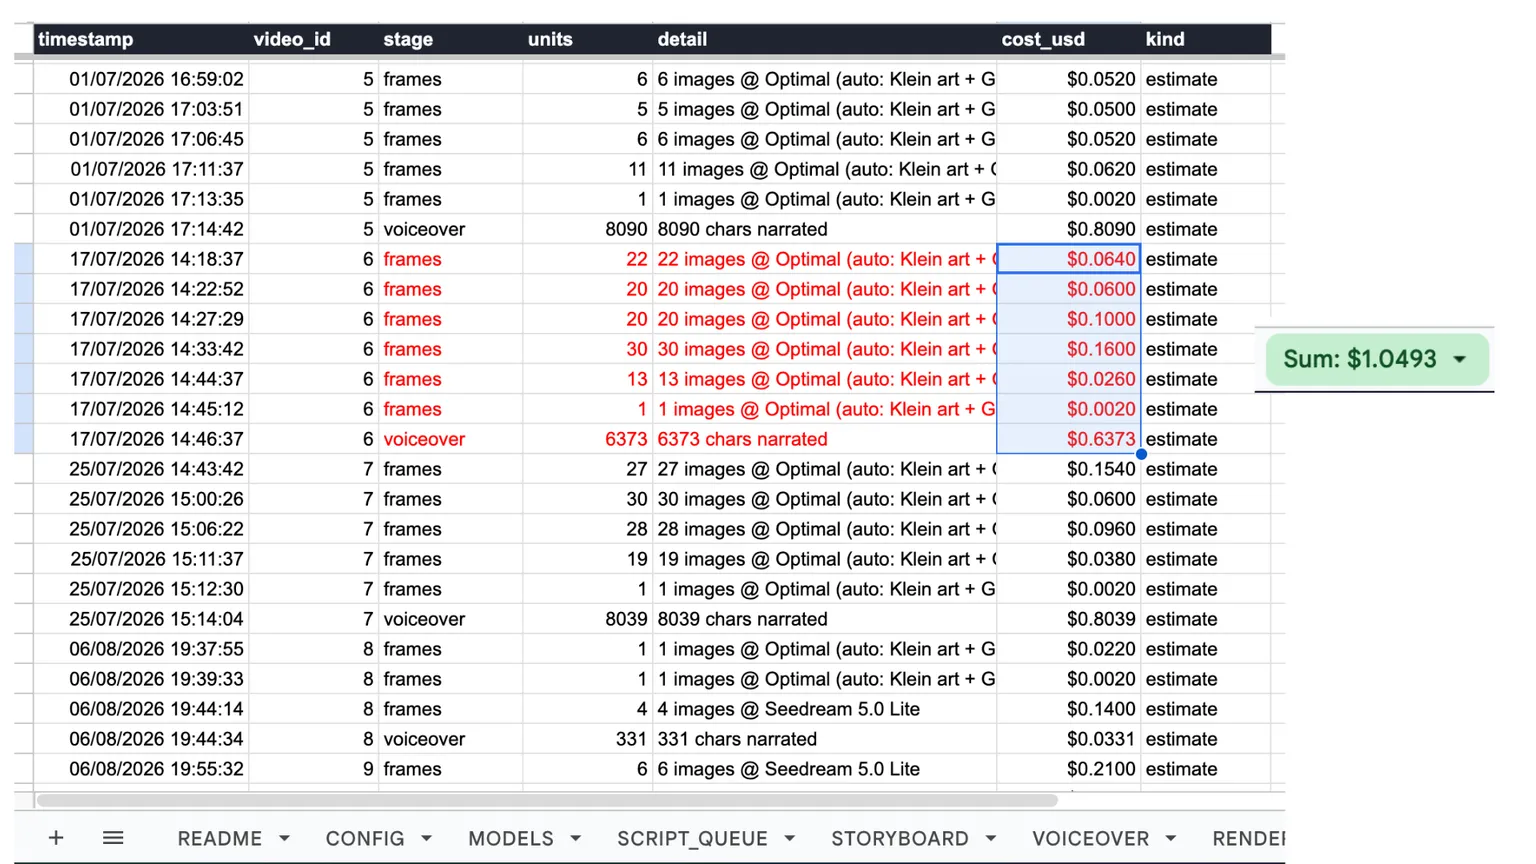
Three honest caveats on that table, because this is the number people quote back.
The voiceover figure is arithmetic, not an invoice. It is characters multiplied by a per-character rate. Two logged runs narrated 6,373 and 8,090 characters, which price at $0.64 and $0.81, and ElevenLabs’ real rate varies by plan. The cost log tracks every stage, but it calculates from a rate card rather than reading a bill, which is why it labels each row an estimate.
The figure is also for the cheapest model on the list. Klein is $0.00169 an image and it is weak at rendering text. Grok is $0.022, which turns the same 200 scenes into $4.40 rather than $0.34, and the Seedream and Qwen tiers sit higher again. A cost per video is meaningless without saying which model produced it.
And it is for six minutes. Narration is billed per character, so a twenty-minute video costs several times as much on voiceover alone. This does not scale gently with length, and anyone quoting a flat per-video figure without saying how long the video is has skipped the part that matters.
The point of getting production this cheap is not to flood YouTube with low-effort videos. It is to make experimentation cheap. You can test more topics, hooks, formats and visual ideas when a flop costs a dollar instead of a weekend, then use what you learn on the next one. Production gets cheaper and faster. The creative side still has to get better.
What I would not hand over
I do not automate the decisions that determine whether a video deserves to exist: the topic, angle, hook, script, thumbnail and final quality check.
That is where a lot of AI channels go wrong. They speed up production, then start handing over the creative judgement too, and eventually every upload feels interchangeable with every other one.
The goal is the opposite. Clear the repetitive work so there is more time to study what viewers actually click, where they drop off, which ideas outperform, and how to make the next video better than the last.
The full faceless YouTube workflow
Script → scene prompts → images → voiceover + timestamps → render plan → MP4
The important part is not any individual AI tool. It is keeping every stage connected so the output of one becomes the structured input of the next.
Building it yourself
You can build this. Take each section of this guide, paste it into Claude or ChatGPT, describe how you want your Sheet laid out, and build it one stage at a time. That is genuinely how mine started.
Expect the first version of each stage to break, usually around API keys, permissions or saving files to Drive. Copy the error back, explain what you were doing, ask for a repair. That debugging loop is the real skill. The workflow itself is fully described here.
If you would rather watch it run than read about it, this is the same second half on screen: the voiceover generated from the Sheet, the timings coming back, the render plan filling in, and Colab assembling the MP4.
The bulk image generation video covers the first half, and both sit in the full workflow playlist.
If you would rather skip the setup and debugging, the finished version is the Faceless YouTube Script to Video Generator: the same Sheet, the same Colab notebook, running on your own Gemini, ElevenLabs and Runware keys.
Frequently asked questions
How do you make a faceless YouTube video from script to finished MP4?
Five stages, in order: write the script, turn each line into an image prompt, generate the scene images, narrate the script and capture per-line timings, then assemble the images against those timings into a video. The workflow here keeps all five in one Google Sheet, one row per scene, so nothing has to be exported, renamed or matched back up by hand.
How much does a faceless YouTube video cost to produce?
For a six-minute video of roughly 200 scenes on the cheapest image model, roughly $1 to $1.25 in direct generation cost. Images measured $0.34 on FLUX.2 Klein at $0.00169 each, read off a Runware billing dashboard on 13 August 2026. Voiceover is $0.64 to $0.81, calculated at $0.10 per 1,000 characters narrated. The Colab render is free. Better image models cost several times more, and scene-prompt writing through Gemini is billed by Google and has not been measured, so it is not in that total.
How do you sync 200 images to a voiceover without editing by hand?
Ask the voice API for timings, not just audio. ElevenLabs returns the start and end time of each line alongside the narration, and those get written back into the matching rows. Every image then already knows its on-screen duration, so the cut is built from a table rather than dragged onto a timeline.
Can you render a video without a video editor?
Yes. A free Google Colab notebook reads the images in scene order, pulls the timing data, adds the voiceover and passes all of it to FFmpeg, which holds each image for its recorded duration and writes the finished MP4 back to Drive. No timeline, no editor.
Is this YouTube automation?
It automates parts of video production, not the creative decisions behind the channel. The system can generate prompts, images, voiceover timings and the final assembly, while the topic, angle, hook, script, packaging and final quality review remain human decisions. Channels that hand over that second list too are where the output starts feeling interchangeable.
Do I need to know how to code to build this?
No, but you need to be willing to paste error messages back. Take each section of this guide, describe your column layout to Claude or ChatGPT, and build it one stage at a time. The first version usually breaks around API keys, permissions or file saving. Copying the error back and asking for a repair is the actual skill.
Sourcing
Evidence behind this guide: First-hand testing, Provider pricing page.
Figures last checked .
- Runware pricing · accessed
- ElevenLabs pricing · accessed
Where cost figures come from, what each evidence label means, how often pages are re-checked and what is explicitly not tested is set out on the methodology page.
Related guides
- AI Tools & Workflow5 min read
200 stickman scenes from one Google Sheet
A finished script becomes 200 scene prompts, then 200 images through Runware. What the batch measured at, and the references that hold the character.
- Cost & Economics9 min read
My 90-minute sleep documentaries cost under $1
A 15,000-word Claude script runs about $0.30 on my own key. The section-by-section workflow, the CapCut assembly, and how a YouTube video stays under $1.
- Cost & Economics1 min read
What "own your stack" actually means
Owning your content stack means holding the API keys, the prompts, and the logic yourself, so no vendor can price you out or shut you down.